
Introduction
Image optimization is one of the most neglected areas when it comes to driving search traffic and increasing conversion rates and sales for any eCommerce site.
In terms of SEO, most people think about keywords, content & backlinks while neglecting other powerful ways to optimize their site. On top of that, more visually appealing, faster-loading photos often result in higher conversion rates and sales.
Did you know that 1 second delay in page loading time costs Amazon $1.6 billion in revenue?
Here are just a few of the many reasons why you should optimize your images.
Reason 1 – Optimizing the images on your site will help your eCommerce store rank higher in organic searches as a whole.
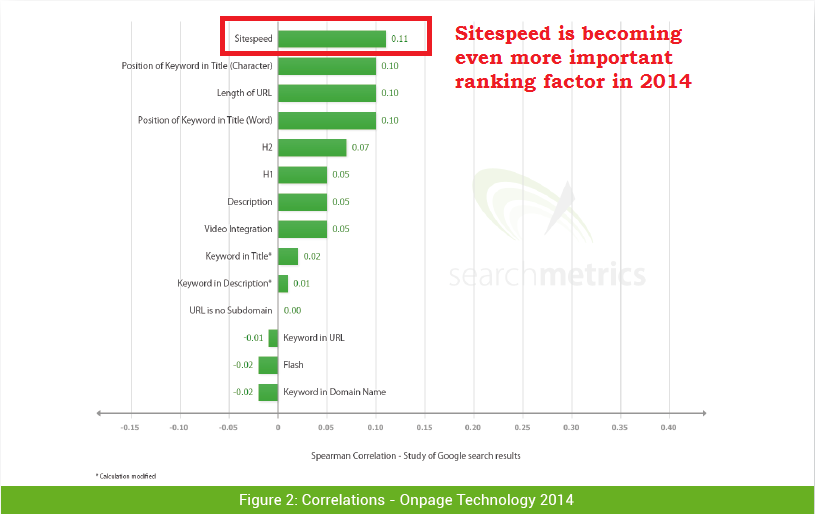
A recent study performed by Search Metrics shows loading speed is becoming an increasingly more important SEO factor in 2014 and images directly affect this. Clearly, it can be detrimental for any eCommerce site that doesn’t optimize the size of all visual elements.
The number of pictures on a page also affects search ranking. So the more pictures on your page, the better you’ll rank in Google.
Reason 2 – Image optimization also brings you a new source of traffic from image searches. This service allows users to perform a search just for images and can lead more visitors to your site.
Reason 3 – Optimizing your images will affect more than just your search traffic. A faster loading time drives more clicks and higher conversions for eCommerce websites. In other words, pictures directly impact revenue.
I can go on, but you get the point.
If you want to get the most ROI out of your images, make sure you follow these 20 tips.
Tip 1: Focus on choosing high-quality images first
There is no point in optimizing low quality pictures for your eCommerce store. Even if they appear in search results, the images won’t look visually appealing and people won’t be motivated to click on them.
Start with high quality pictures that best represent your products. Make sure you choose ones with your target audience in mind, rather than focusing on your personal preference.
It’s clear that quality images have become a crucial part of the content strategy and directly affect SEO. Pages with high-quality pictures also tend to earn more backlinks and have higher conversion rates.
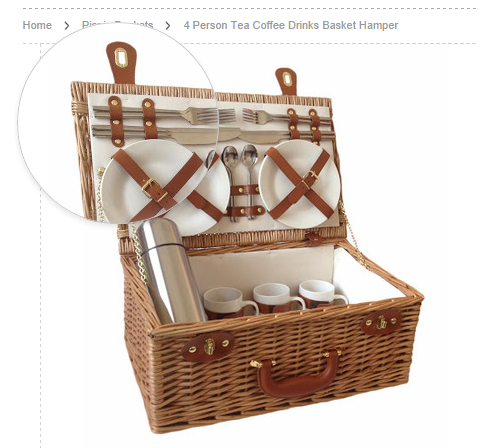
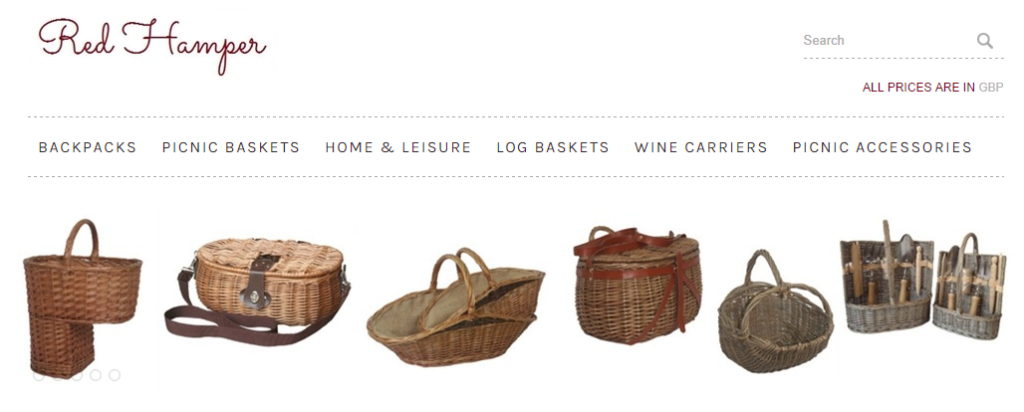
Here’s an example of a high-quality product image:
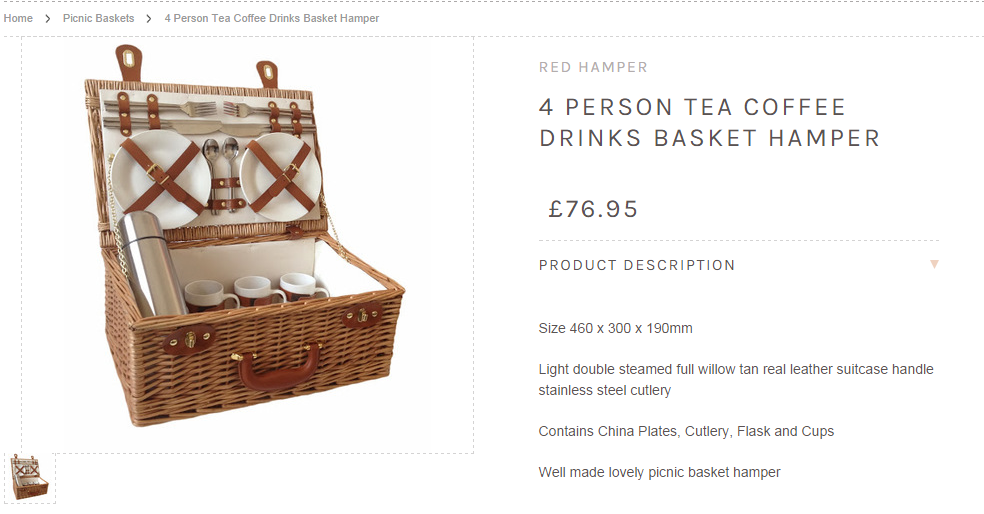
The white background emphasizes the product, the lighting is effective, and you can clearly see all the product details.
Tip 2: Own your copyright
Copying and pasting images from other sites to your eCommerce store is a big no-no. Not only because it’s bad for SEO, but you can also get sued!
Think you won’t get caught? Well, think again.
Site owners can easily check to see if someone is using their images by simply performing an image search using a specific photo.
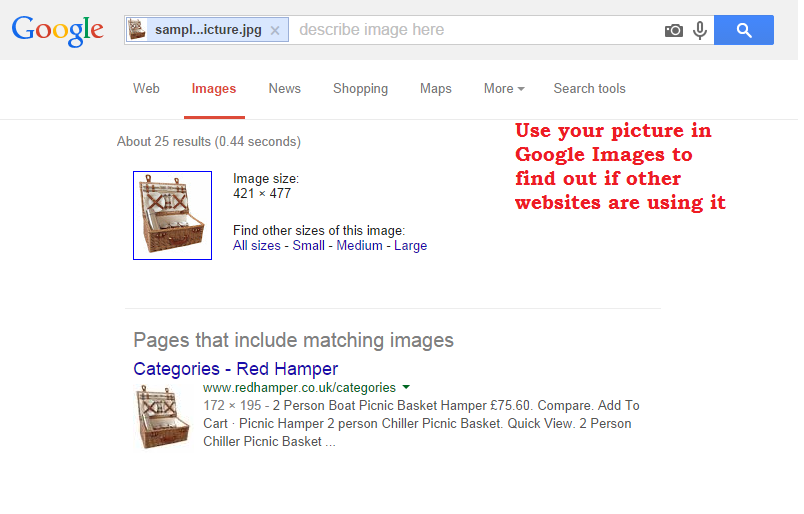
Make sure to check if others are using your images since this could negatively affect your business. They belong to you and you only.
For product photos, always use unique images. They’ll drive more clicks from search engines and conversions. If you’re forced to use stock photos for some reason or the ones provided by your distributors, keep the following in mind:
Google is reading EXIF data from pictures: Exchangeable image file format (EXIF) is a standard that specifies the format for images taken by digital cameras. It also uses special meta tags to store data about the photo and its owner, such as:
- Date & time when it was taken
- Location based on GPS
- Camera model & settings
- Descriptions
- Copyright information
Back in February 2014, Matt Cutts announced that Google reserves the right to use EXIF data in order to help people find information about an image. In other words, search engines can easily use this data to determine if you are rightfully using the photo on your site or not.
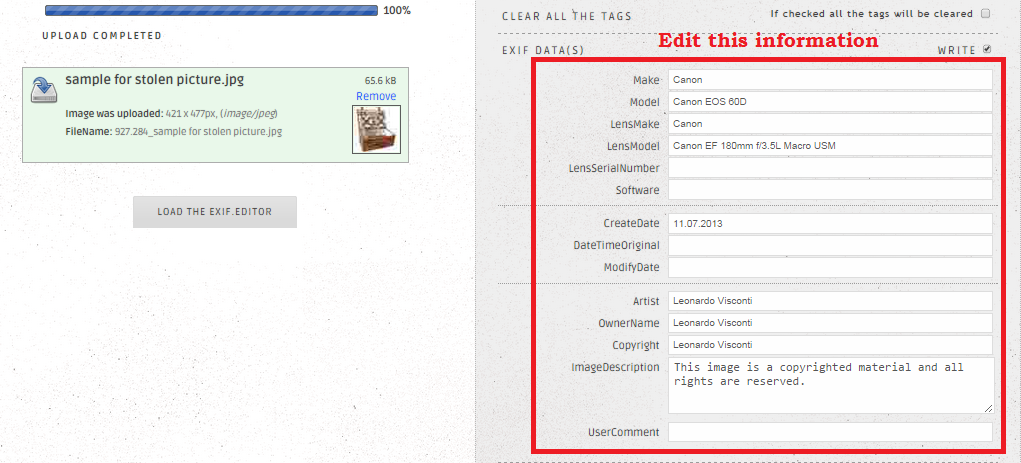
How to edit EXIF data to avoid penalties: In the case where you’re forced to use pictures from third parties, it’s always a good idea to check out the EXIF data first and edit it if necessary.
Here’s how to do this –The website the Exif.er allows you to edit and add metadata to your pictures as if they just came out of the camera’s mouth. All you need to do is upload the images, edit the data and download the new files.
Tip 3: Choose only 1 primary keyword for each picture
Every SEO expert nowadays knows keyword stuffing hurts your ranking. This is especially true when it comes to images.
It’s important to note you should use only 1 keyword for each picture. This can be a word or a phrase that people are most likely to search for.
AdWords Keyword planner tool: The best way to choose a keyword for an image is the old fashioned way.
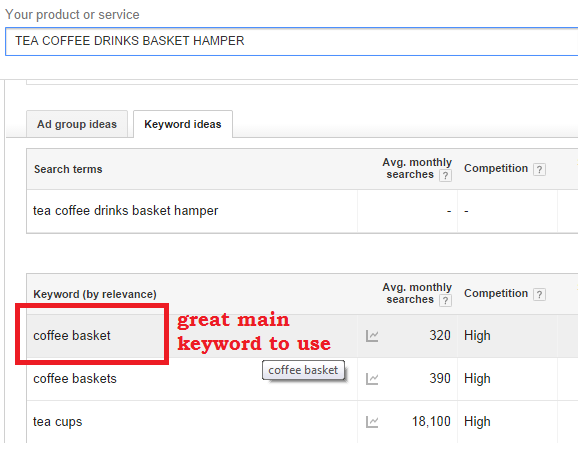
By typing the name of the product “tea coffee drinks basket hamper” in the Keyword planner tool, we find the best word to use in our tags.
Use Google Analytics data for searches on your site: Determining the most common keywords people search for on your eCommerce site can be helpful.
Finding the right keyword is extremely important because this will allow you to write an appropriate file name, alt-tag and title tag, which will increase search engine traffic.
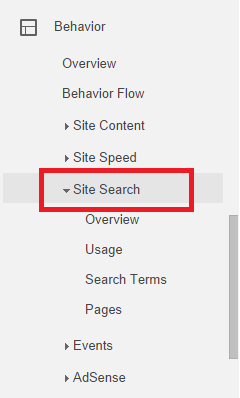
To do this, simply go to Behavior -> Site Search.
You should keep in mind that Site Search must be allowed in advance. If that’s not the case with your website, read this article to learn how to set it up.
Tip 4: Name your image files to improve SEO
Many SEOs upload pictures with their original names, which should not be done.
Naming your files is the first step in optimizing your images. It’s crucial in order to rank well.
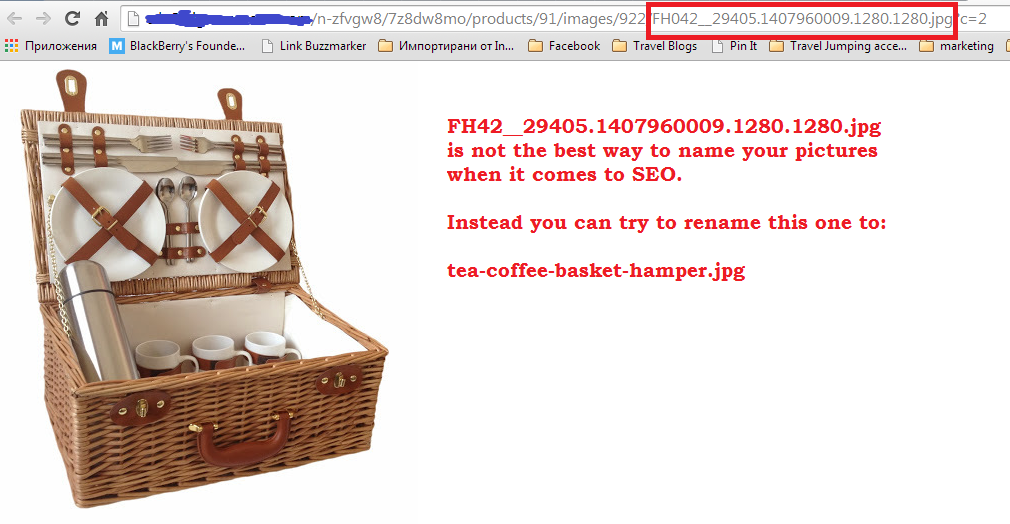
In most cases if it’s a new image from a camera, the file name should look something like
“IMG_1987.JPG”
or
“FH42__29405.1407960009.1280.1280.jpg”
You want it to look more like
“tea-coffee-basket-hamper.jpg”
Now imagine that someone is searching on the web for a specific model notebook: Lenovo Y50.
When Google crawls the web to find appropriate search results for this term and finds a website with a photo entitled “Lenovo_Y50.jpg”, it will come to the conclusion this picture probably represents what the user is searching for. By being specific, you’ll help Google understand what’s on your site and in turn, you’ll rank better.
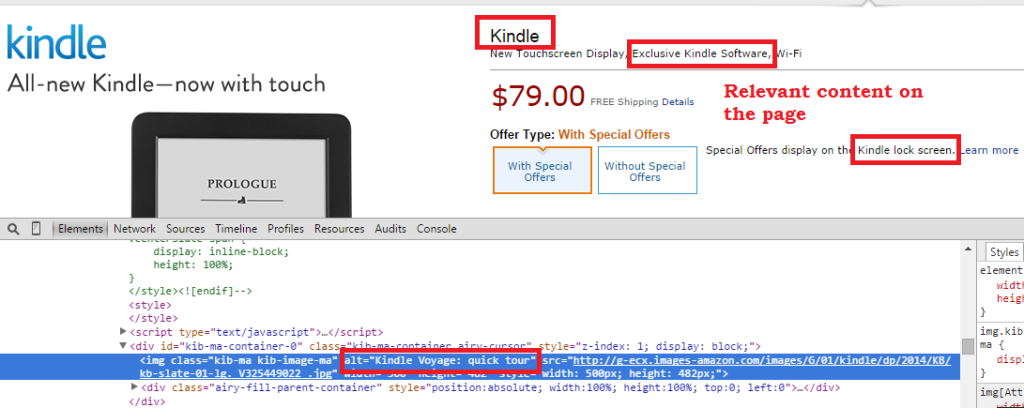
Tip 5: Set up the alt tag
Alt attributes, or so called alt tags, represent information about a picture displayed in the event that the image is not loaded successfully. Since the tag is used to describe the image, Google considers this an important ranking factor.
This is probably the most important metadata related to an image so it’s extremely important to do it right. Here’s how:
Character length: It is recommended you use at least 125 characters for the alt tag. Remember this must be a description of the picture, so you should put extra effort into being specific and accurate.
Should you use keywords?: It is not necessary to use keywords in the alt tag, although you can. It’s more important for the words to illustrate the picture in order to improve the ranking. But as you create alt tags, you will most likely naturally include keywords.
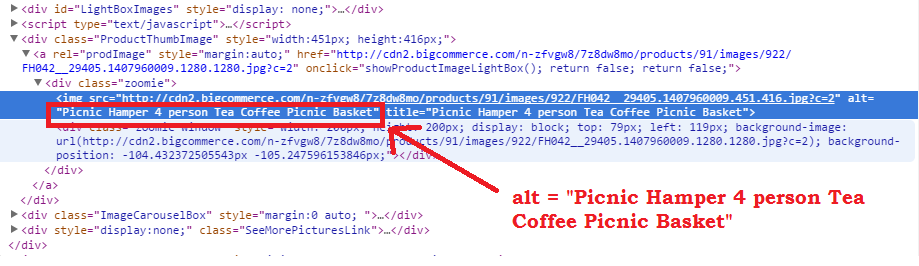
In this example, the alt tag will be something like:
alt = “Picnic Hamper 4 person Tea Coffee Picnic Basket”
Don’t forget to fill out the alt tag for all images on your site. It will take you some time, but the benefits are worth it.
Keep in mind that Google understands the semantics of keywords, such as synonyms, antonyms and how words are connected in general, since the introduction of the Knowledge Graph.
Tip 6: Set up title tag
When you move your mouse cursor over an image, often you see a visual caption with a text. This is the title tag! Its main purpose is to display information about the picture to the user. In most cases, it even increases the chances of the user clicking.

We’re not sure of the precise weight of the title tag as a search ranking factor, but it’s certainly not going to hurt your site. That’s why you should do it. Alt-tag is more important, but it’s supplemented with other tags.
When writing the title tag consider the following:
- Write it to catch the visitor’s attention first. This will drive you increased clicks and sales.
- Don’t simply rewrite the alt tag.
- Include your main keyword there.
Tip 7: Use surrounding text
One of the key ranking factors for 2014 is relevant content.
Make sure the text surrounding the images is relevant. When Google crawls your images, it also checks the surrounding content.
Make sure to optimize the following:
- Image captions
- Title of the page
- Text & keywords of the page
Here we must go beyond just keyword matching. After the Hummingbird update, Google is paying much more attention to semantics and context. Now search engines much better understand the meaning of words and can make connections between them.
So if Google crawls a website and sees pictures of women when the text on the page is about cars, this will result in a bad ranking.
At the same time, if there is a picture of Levi’s jeans and the text is about fashion, Google will find the connection. This allows the website and its images to rank higher.
Tip 8: Monitor page load time
The Search Metric’s study shows that page load time became an even more important ranking factor in 2014.
Images can slow down any website. This turns out to be quite a significant problem, especially for eCommerce owners who store thousands of images on their own domain. Because of their file size, web pages with more & bigger images take more time to load, which slows down the website.
How Google views slow sites: Google measures site speed directly while crawling pages or indirectly via user signals, such as CTR and bounce rate. When Google finds a website with slow load time, this sends a poor signal which results in a decreased ranking.
Slow loading pages hurt your conversion rates and sales: Loading time is a major factor affecting your conversion rates and sales. Remember: every second counts!
An average user has little patience to wait for a page to load, and as a result, will leave or go elsewhere. This problem is even bigger when it comes to mobile users since it’s typically harder to load pages on these devices.
According to research done by KISSmetrics, it is estimated that a 1 second delay in loading a page can result in a 7% reduction in conversions. This means if an eCommerce site is making $100,000 per day, a 1 second page delay could potentially cost the website owner a $2.5 million loss in revenue each year.
How to use Google Analytics to determine slow loading problems: Use the “Site Speed” tool in Google Analytics to monitor page load times. You can compare how each page is performing in comparison to the site average. This will allow you to uncover when you’re using too many or oversized images, in order to improve pages which need attention.
A general rule of thumb is page load time should be between 3 and 5 seconds.
Tip 9: Reduce image file size
Image file size is a huge factor that affects your website load time. The bigger they are, the more likely they will slow down your eCommerce store loading times. At the same time, you should be careful not to reduce the size too much, as this will affect the quality and ultimately, your conversions and sales.
How big or small should the image file size be?
When it comes to eCommerce, it is best to keep your image file’s size below 70 kb. This is not always an easy task, but it’ll pay off if you do it right.
It’s important to state that you can reduce the size of your images without compromising their quality. Here are some ways to do it:
How to resize your images in Adobe Photoshop: One of the easiest ways to resize your images is by using Adobe Photoshop. You can do this by saving the image for the web and adjusting it to the lowest file size, while still keeping the quality in mind.
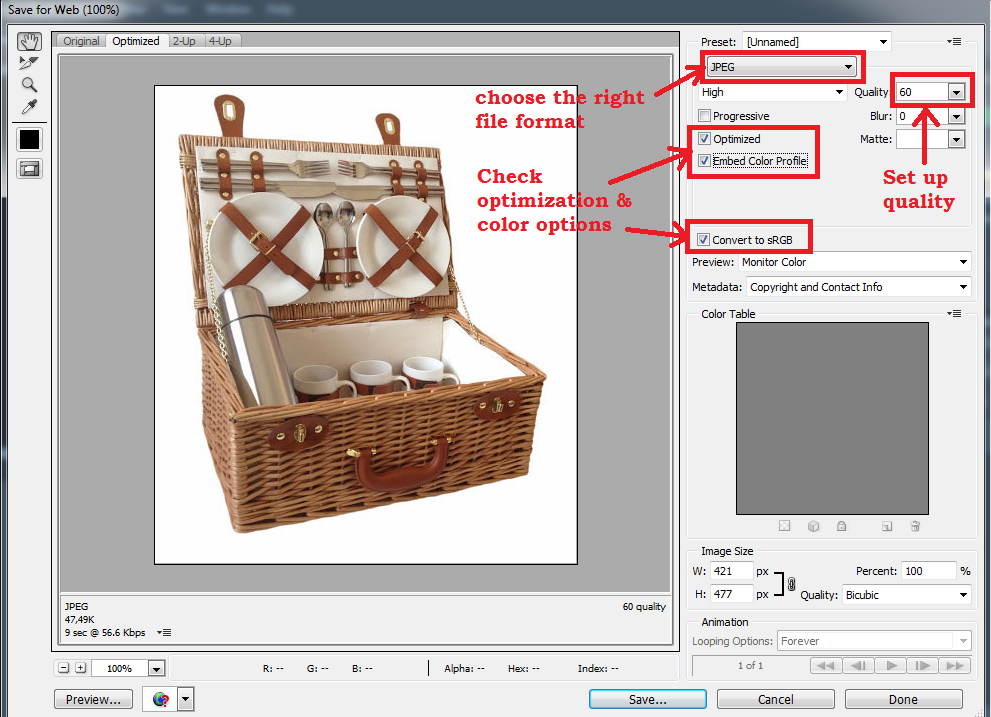
On the menu, simply go to File -> Save for Web and adjust your settings.
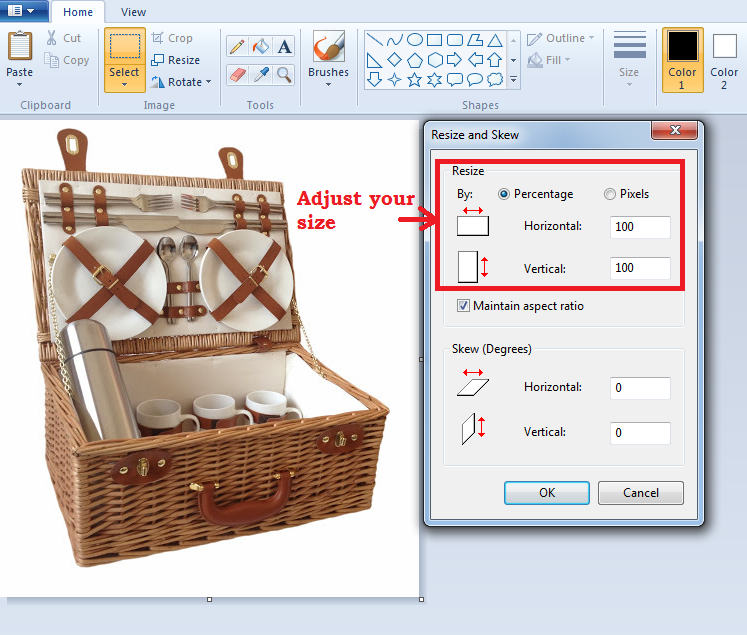
How to resize your images in Paint: Paint gives you fewer options when it comes to resizing images, but it’s definitely faster and easier. Here’s how:
Other ways to reduce image file size: There are some great online services that allow you to easily upload and resize your images for free. Here are a few:
Note: It’s important to export the image in RGB color profile.
Tip 10: Which image file types to use
The 3 most common file types used nowadays are JPEG, GIF, and PNG. Most people don’t know the differences between them but choosing the right file type is extremely important for your site load time. So let’s take a look. Here are the following file types you should be using:
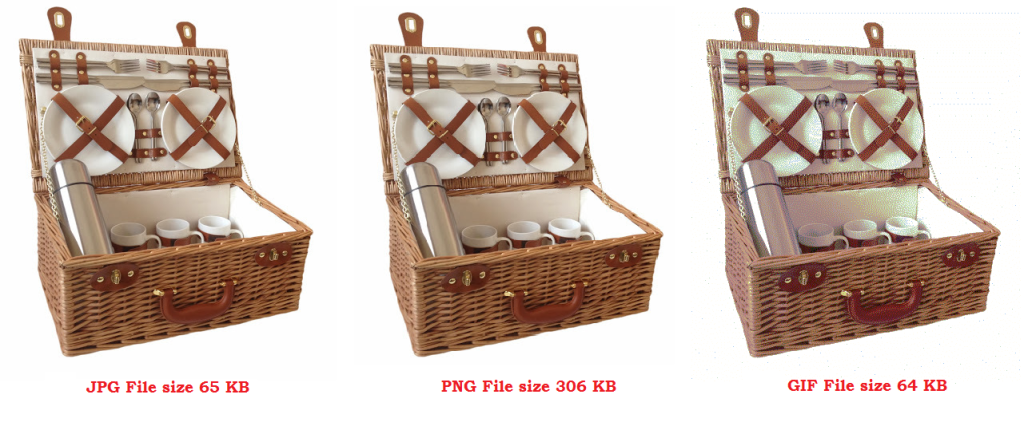
JPEG file types: This is one of the oldest and most common image file types. This format compresses the data and allows you to enjoy an image of nice quality at a small size.
Keep in mind when editing and saving a JPEG image that you’re lowering its quality with time. So it’s always a good idea to keep the original photo as a backup.
JPEG images are perfect for almost all pictures on your site, from product pictures to other graphics that require good quality and small size.
GIF file types: They provide you with a lower quality image and are not good to use for complex photos. However, this type makes sense for graphics of only a few colors, since they can be much smaller than JPG and colors are clearer than with other formats.
This file type is perfect for plain images on web pages such as icons, buttons & other decorative images.
PNG file types: They are becoming more popular with time. They allow you to have high quality images, which is not lost with re-saving and editing like in the case of JPEGs.
A great feature that all PNG files have is transparency, which you can use to add and place an image without a background on your site.
However, you should be careful because these file types are in general much larger. They are great for large images or transparent photos on your eCommerce site.
There are 2 image file types you should not be using at all on your site. That’s mainly because of their super large size, which will kill your loading time.
Make sure you do NOT use RAW and TIF file types for your images. Both are unusable for the web because of their large size and must be converted to JPEG, GIF or PNG before being uploaded.
Tip 11: Add small & large size versions for each picture
While optimizing your images in terms of size, you don’t want to neglect the user experience.
You should provide your visitors with the option to view your small photos in a larger size because this will result in higher conversion rates and sales.
The biggest mistake you can make here is to simply place your large image on your webpage and shrink its dimensions via the source code. Instead, you want to have 2 pictures:
- Small one for the webpage that will allow faster loading
- Bigger one the user clicks to enlarge in a pop-up window
Note: Don’t use exactly the same file names and alt-tags for both pictures.
Tip 12: Add a variety of images for each product with different dimensions & angles
When users search for images online, they often look for a shot from a specific angle.
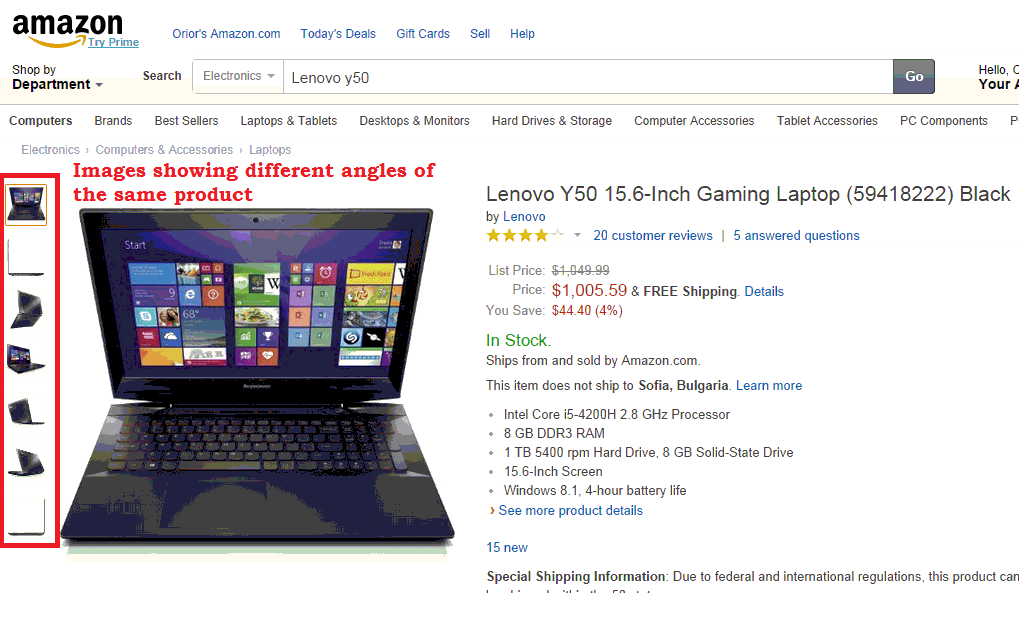
In the case of a Lenovo Y50, maybe they want to see a frontal photo or a picture of the side. They might also be interested in seeing how the case looks when it’s closed or a closer shot of the keyboard.
By displaying various dimensions and angles of your products, you’ll have more pictures to rank and you multiply your chances of increasing search traffic.
Take the time to optimize the file names and alt-tags for specific dimensions & angles to take advantage of this opportunity.
Some examples:
File name: Lenovo-Y5070-Frontal.jpg with alt-tag: “Lenovo Y5070 Frontal”
File name: Lenovo-Y5070-Keyboard.jpg with alt-tag: “Lenovo Y5070 Keyboard”
File name: Lenovo-Y5070-Sideview.jpg with alt-tag: “Lenovo Y5070 Sideview”
Adding different dimensions and angles of your products also helps you improve your conversion rates and sales, especially when it comes to higher priced items. This allows the visitor to experience the product fully prior to making a purchase decision.
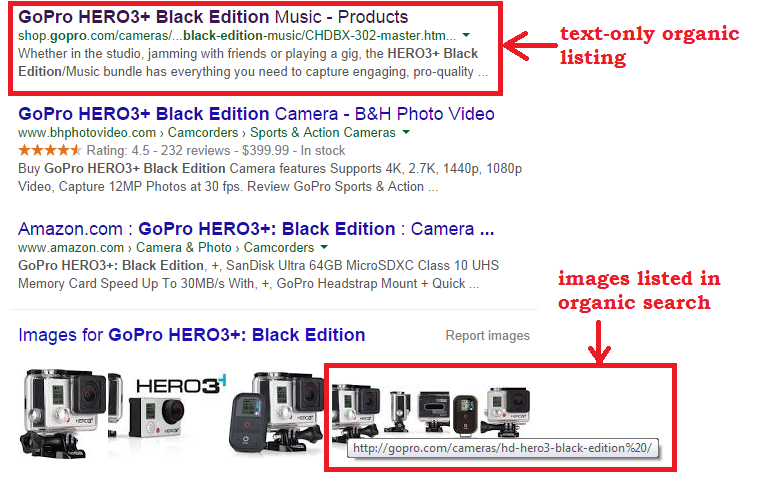
Tip 13: Use thumbnails
Thumbnail pictures are great to use in search results, both in Google and inside your own eCommerce store.
Search result pages with thumbnail pictures tend to receive more clicks and traffic–simply because they stand out from other text-limited results.
How to get product thumbnail pictures to show up in organic search results: List your products in Google Merchant Center and write your alt-tags the right way. Then the search engine will use them when it shows results and if there’s a thumbnail, it will be displayed as a result among your text links. This way you might be able to rank twice for the first page.
Tip 14: Optimize your logo(s)
The logo is by far the most important image to optimize for any site, yet it’s often neglected.
If done well, it could represent a considerable number of opportunities to rank better for search engines. Google is very good at ranking a company’s site and brand logo.
Another great benefit is that well-optimized logos often lead to more publications about your business, and they bring you greater brand awareness and recognition. Imagine a blogger who decided not to write for you simply because he couldn’t find a decent logo image.
How to optimize your logo:
Include your brand name in the filename and in the alt-tag: Don’t name your file just “logo.gif”. Use your brand name to make it look better “Best-buy-logo.jpg”. For the alt-tag, you can use a bit more information to describe what your business does:
Alt = “Best Buy The ultimate technology showroom”.
It’s important not to over-optimize here with keywords because you might get penalized.
Link back to your homepage with the right title attribute: For the best results, you also need to link the logo to the homepage of your eCommerce store. You can further optimize it by adding it to the link with a title attribute.
For example:
<a href=” https://www.bestbuy.com/” title=”Best Buy”> <img src=” https://www.bestbuy.com /images/best-buy-logo.gif” alt=” Best Buy The ultimate technology showroom”></a>Use Schema.org markup: Schema.org is a markup introduced by Google that helps search engines identify which image represents the official logo of a company or brand.
Here’s how to use it:
<div itemscope itemtype=”https://schema.org/BestBuy”> <a itemprop=”url” href=”https://www.bestbuy.com/”>Home</a> <img itemprop=”logo” src=”https://www.bestbuy.com /best-buy-logo.gif ” /> </div> <div itemscope itemtype=”https://schema.org/BestBuy”> <a itemprop=”url” href=”https://www.bestbuy.com/” title=” Best Buy”> <img itemprop=”logo” src=”https://www.example.com/ best-buy-logo.gif” alt=” Best Buy The ultimate technology showroom” /></a> </div>This also increases the chances of your logo appearing within the Knowledge Graph box when people search for your brand name. As a result, you will get higher CTR and increased traffic to your site.
Tip 15: Don’t forget about decorative images
Decorative images include all non-product images on your site. This includes backgrounds, borders and buttons.
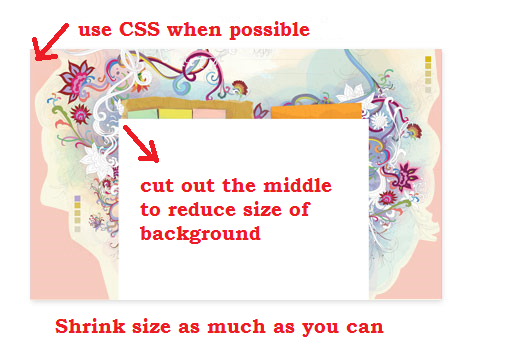
Their main purpose is to enhance your design and improve the user experience. However, you need to be extremely careful with them. Their size is often neglected, and they might affect how fast your pages are loading.
To be sure that you’ll have fast-loading images, do the following:
- Whenever possible use CSS instead of a real image. This will make your website load so much faster.
- Cut out the middle of the background image. That way you’ll reduce its size without anyone noticing.
- Shrink your decorative images as much as possible without compromising quality.
Tip 16: When & how to use CDN without losing backlinks opportunities
Note: This tip is for information purpose only. Shopify already takes care of this automatically.
Content delivery network, or CDN, is a large distribution system of servers deployed in multiple data centers across the Internet. Their architecture allows visitors to load content from your site much faster, despite their current location.
Should you use CDN for your site? It is not mandatory to use CDN for your eCommerce store, but it can be beneficial if you have:
- A large number of visitors per month
- International visitors
- Large peaks in visits (consider getting one for Christmas)
Cons of using a CDN: Probably the only drawback of using a CDN is, if your images are hosted on their server, you won’t be getting any backlinks to your site and this could hurt your ranking a bit.
How to avoid drawbacks? However, there is a way to benefit from CDN’s faster loading time and still get backlinks for your pictures. All you need to do is to connect your subdomain with the CDN by adding a CNAME record to your DNS. For example cdn.yourdomain.com.
Tip 17: Add an Image sitemap to your site
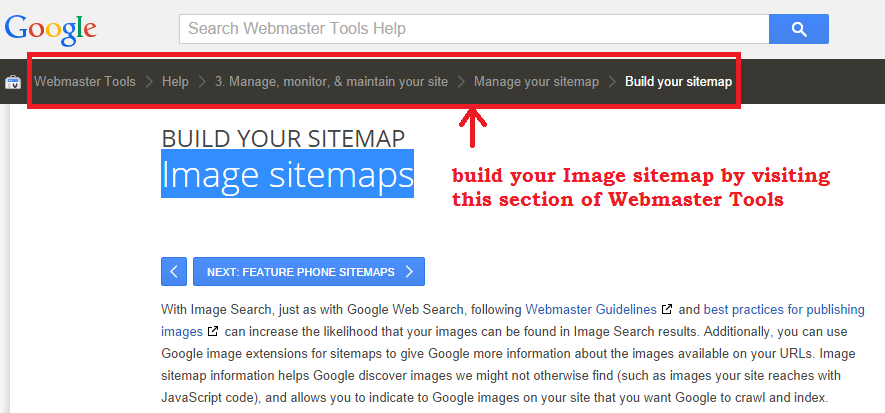
The best way to help Google find more of your images is to list them in an Image sitemap. This will increase the likelihood of your pictures being found in an Image Search.
If you don’t list your pictures, there is no guarantee that search engines will be able to crawl and organize them successfully.
Additionally, you can use this to provide Google with more information about your images so the search engine can show them, as a result, more effectively. That’s why it’s often a good idea to create a separate sitemap for your images. You can start by following these guidelines.
Tip 18: Collect social signals for your images
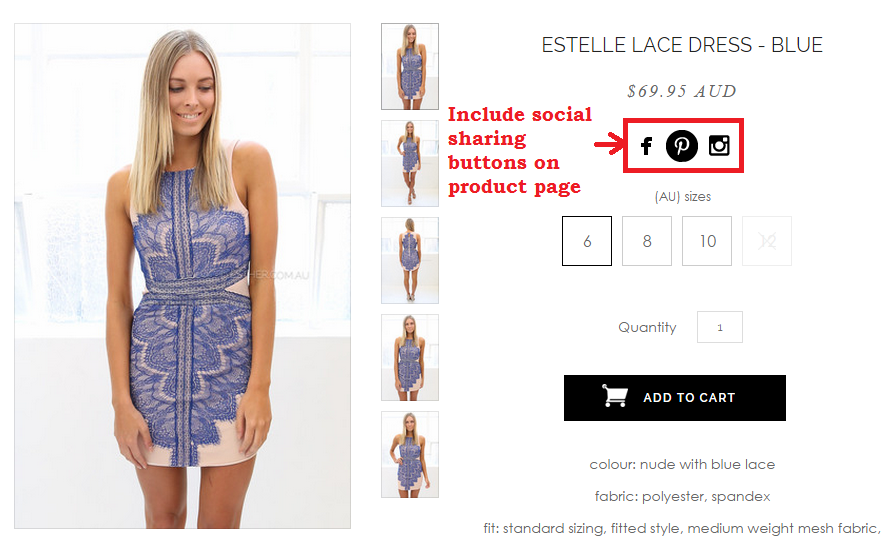
What are social signals?
Social signals are any type of social interaction with your a webpage such as Facebook share, Facebook like, Tweets, Retweets, Pins, etc.
Why is it important?
According to the Search Metric’s study in 2014, social signals remain an important search ranking factor.
Out of all social media channels, Pinterest is the most effective avenue to increase social signals (pins) for your images.
You can increase share on Pinterest by doing the following:
- Add a visible pin button when a visitor places the cursor on the image
- When someone buys a product, offer to pin and share the image
On top of SEO benefits, sharing your images on Pinterest will also
- Bring you lots of social traffic
- Increase your products’ chance of going viral.
- Further engage your audience with your brand and products.
- Increase direct sales
Pinterest is one of the top channels that drives ecommerce sales. According to a recent study 69% of online consumers who visit the social network have found an item they’ve purchased or wanted to purchase.
So make sure you take advantage of it.
Tip 19: Improve image loading speed for responsive theme
With the rise of mobile traffic, more and more eCommerce sites need to pay special attention to these types of users. Unfortunately, your “desktop” website is often not a great fit for the smartphone’s small screen.
In addition, normal websites take forever to load on mobile devices, especially if you use 3G. Now this can kill all your SEO traffic, conversions and sales if you’re not careful.
That’s why if you want to turn these visitors into paying customers, you need to develop a responsive or a mobile site to bring them the best possible experience.
However, there are a few issues with SEO when it comes to this.
Responsive design makes it harder to optimize images: This is because it replaces the <img> tag with images called for via CSS. This removes the ability to optimize them effectively with alt attributes and captioning.
How to deal with this issue: When dealing with a responsive design, host the lowest file size image in the <img> tag and then change it via the CSS for non-mobile users. For smooth image scaling cross-browsers, you can use the Fluid Image techniques developed by Ethan Marcotte.
Then you can link to your preferred large image in HTML and use Adaptive Images to handle loading in appropriate image file sizes for the requesting device.
Tip 20: Make sure to keep testing & improving your store’s image performance
In the end of the day, results may vary depending on your niche, audience, and product. Some tips will give you better results than others. The best way to learn which ones work best for your site is to test test test.
Key things you should test and analyze:
- Which images bring you more search traffic and why
- Which pictures on your site drive higher CTR rates, conversions and sales
- Which angles of images work better: Both in terms of search traffic and conversions
- How many pictures to put on a product page
You can use Optimizely or Visual Website Optimizer to split test your images changes.
What to do next…
Now you have these image optimization tips in your arsenal, you need to do the most important thing:
Implement them!
And before you start optimizing your images, leave me comment below right now. Let me know which tips you’d like to implement first or if you have a question.
Comments